|
|
| (C001FA_Sharon_2) | (C002FA_Ponytail_9A) |
Step Two
Alright, now its time to open your trusty ole paint program. That
was hard, eh? (Don't worry, it doesn't get much harder.)
Choose the base face that you want to use from the faces folder
you took from Facelift. Now, see all those funny looking black
and white things? Those are hair outlines. You need to pick on
that has a hair shape you like, though it really doesn't matter
which one it is, as long as its a long haired one.
I've choosen these:
|
|
| (C001FA_Sharon_2) | (C002FA_Ponytail_9A) |
Now, take your blank face and go ahead and convert it to 24-bit color. In PSP, hit Shift+Control+0 or Colors/Increase Color Depth/ 16 Million Colors [24 bit]. In Photoshop, Image/Mode/RGB Color. This is a very important step (as is decreasing the colors when you're done).
Pull up the hair outline and using the Magic Wand tool, click on the black area then reverse the selection by: (PSP) Shift+Cntrl+I or Selections/Invert, alternatly, (Photoshop) Select/Inverse or Shift+Cntrl+I. Now copy the selected area and past it onto the blank head as a new layer. In Photshop you'll have to create a new layer before pasting; in PSP you can just Paste as a new layer.
| You should have something similar to this now: |
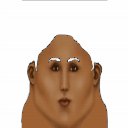 |
I've decided that I want to make a brunette with
a reddish tinge. Now, theres a slight difference in PSP and
Photoshop here, so I'll break them up into two different pages.