|
|
| Head done in Paintshop | Head done in Photoshop |
Step 6
There are two things left. Converting to 256 colors and saving.
First of all, converting. This is a very important step. If you do not do this step, your skin will NOT show up in the game. It will be a lovely whitish blob.
In PSP: Shft+Cntrl+3 or Colors/Decrease Colors Depth/256 colors [16 bit]. Photoshop: Image/Mode/Indexed Color.
Sometimes the skin will get a little bit darker. Thats normal.
Saving is our last step. First of all, you must remember the naming conventions of a head skin. All heads begin with the letter C. Following that are generaly 3 numbers (occasionally there will be a letter replacing one number). CXXX-
Following the numbers is the abreviation telling the game what sex the head is for; either FA (female) or MA (male). Then comes the skin tone: lgt (light) med (medium), or drk (dark). For our head, we now have C721FaMed (with 721 being the mesh number of RealCurl). All thats left is a name for the file itself. Hows about sproing? Yes, I said sproing. (Don't ask- I name my files very odd things- it prevets the very slim chance of overwriting anything). So now, I'd save my file as C721FaMed_chaossproing.bmp. You may, of course, name it what ever you want (as long as you only change the name after the _ part). Also, it must always be saved as a bitmap (.bmp) As you may know, to put the head in the game, save it to Maxis/The Sims/Game Data/Skins
If you want to view your head, you can place the image in the viewing program of your choice.
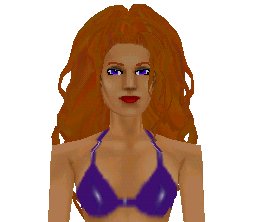
And the finished result:
|
|
| Head done in Paintshop | Head done in Photoshop |